Tuesday, March 5, 2013
Friday, March 1, 2013
Re-framing The Dark Knight Rises Blu-ray Part 3: The Blu-ray
So now you have a MKV but you want a Blu-ray, here is what you do. Download these three programs:
uncropMKV (http://www.videohelp.com/tools/uncropMKV)- For changing the resolution of the MKV
tsMuxeR (http://www.videohelp.com/tools/tsMuxeR)- For creating the Blu-ray files
ImgBurn (http://www.imgburn.com)- For burning the Blu-ray
Install all the programs.
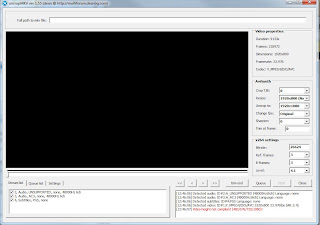
1. Run uncropMKV. Right now your MKV file is 1920 x 800 but it needs to be a compliant Blu-ray resolution. uncropMKV with change your file back into an acceptable 1080p Drag your MKV into uncropMKV. It should automatically fill out the important settings but if it doesn't, under avisyth make sure uncropMKV is set to 1920 x 1080.
Check which audio formats you want in the bottom. uncropMKV does not support Dolby True so in this case only select the lossy, legacy Dolby Digital (.ac3). Click on Queue and then Start. This will take a couple of hours to run. The new file should have a -uncrop after it.
2. Run tsMuxeR. Drag your uncrop file into tsMuxeR.

Make sure the FPS is set to 24000/1001 . You can see the DTS + MLP so that is the DTS-HD MA soundtrack. Even through it shows DTS-HD MA, tsmuxer appears not to support any Lossless audio formats at the moment. Same for Dolby True. It is better to create the disc only with regular DTS (.dts) or regular Dolby Digital (.ac3). Under output, click Blu-ray disk and set your output. You can change other settings on the tabs at the top but it is best to leave those alone.

You should get two folders: BDMV and CERTIFICATE. These files will create a simple Blu-ray with no menus, that will play as soon as you place it in your Blu-ray player of choice
3. Run Imgburn. Follow this guide to burn your BR:
http://adubvideo.net/how-to/burn-avchds-blurays-imgburn
Once burned you have your re-frame copy of The Dark Knight Rises on Blu-ray. Enjoy!
uncropMKV (http://www.videohelp.com/tools/uncropMKV)- For changing the resolution of the MKV
tsMuxeR (http://www.videohelp.com/tools/tsMuxeR)- For creating the Blu-ray files
ImgBurn (http://www.imgburn.com)- For burning the Blu-ray
Install all the programs.
1. Run uncropMKV. Right now your MKV file is 1920 x 800 but it needs to be a compliant Blu-ray resolution. uncropMKV with change your file back into an acceptable 1080p Drag your MKV into uncropMKV. It should automatically fill out the important settings but if it doesn't, under avisyth make sure uncropMKV is set to 1920 x 1080.
Check which audio formats you want in the bottom. uncropMKV does not support Dolby True so in this case only select the lossy, legacy Dolby Digital (.ac3). Click on Queue and then Start. This will take a couple of hours to run. The new file should have a -uncrop after it.
2. Run tsMuxeR. Drag your uncrop file into tsMuxeR.
Make sure the FPS is set to 24000/1001 . You can see the DTS + MLP so that is the DTS-HD MA soundtrack. Even through it shows DTS-HD MA, tsmuxer appears not to support any Lossless audio formats at the moment. Same for Dolby True. It is better to create the disc only with regular DTS (.dts) or regular Dolby Digital (.ac3). Under output, click Blu-ray disk and set your output. You can change other settings on the tabs at the top but it is best to leave those alone.
You should get two folders: BDMV and CERTIFICATE. These files will create a simple Blu-ray with no menus, that will play as soon as you place it in your Blu-ray player of choice
3. Run Imgburn. Follow this guide to burn your BR:
http://adubvideo.net/how-to/burn-avchds-blurays-imgburn
Once burned you have your re-frame copy of The Dark Knight Rises on Blu-ray. Enjoy!
Re-framing The Dark Knight Rises Blu-ray Part 2: The MKV
First, I assume you have a legitimate copy of The Dark Knight Rises (DKR) on Blu-ray. I'm not writing these guides to encourage bootlegging or theft. Give people their just dues.
A Matroska file or MKV is simply a video and audio container for your computer. It is meant to be a simple universal file type that can contain almost any format of video or audio possible.
Here are the tools you need to create one:
Makemkv (http://www.makemkv.com/) - To rip the Blu-rays to a MKV
Handbrake (http://handbrake.fr/) - To crop the blu-ray and re-encode
You might also want:
VLC (http://www.videolan.org/vlc/index.html) - To play back the MKV, if you don't have the software for playback
Mediainfo (http://mediainfo.sourceforge.net/en)- To see what the files you create contain.
It is important to note that all these tools and programs are on both Windows and Mac but Part 3, where we will build the new Blu-ray, is Windows only.
Install all the programs. Load the Blu-ray into your blu-ray drive.
1. Run Makemkv. Once the disc is inserted , Makemkv should auto scan the drives on your computer. In the Source drop down select your Blu-ray drive. It should read DARK_KNIGHT_RISES for the label.
Click on the Blu-ray to Hard Drive icon. Wait for Makemkv to scan the Blu-ray's Titles
2. There should be 3 Titles. Unselect the first and the third, so that only the second one with a size of 36.0 GB/16 chapters is selected. Expand the Title. Make sure you have DTS-HD Lossless selected (it is unslected by default). Unselect all other language and subtitle options and enter a output directory on your local computer.
Click on the Make MKV button on the left. Depending on your drive speed and computer performance; this can take anywhere from 20 mins to a hour to rip.
3. So you should have a MKV about 35 GB in size. Open Handbrake. Click on Source and File and open the MKV that you created. The profile on the left should be regular/normal. On the Output Setting pull down select MKV. Under Destination create the name/path of the new file. On the Picture tab under Size go to the anamorphic pull-down and select none. Set the width to 1920 and the Height to 800 (this will give you 2.40 aspect ratio). Under Cropping set the Top and Bottom to 140. All of this will give you a center 2.40 aspect ratio that matches the 35mm scenes.
4. In Handbrake select the Video tab. Leave the codec as h.264 and Framerate as same as source. Click on Avg Bitrate and enter 26000 (26000 kbps) which is roughly the same bitrate as the original Blu-ray. Check 2-Pass Encoding and Turbo first Pass. Use Constant Framerate unlike this picture.
5. Select the audio tab. The default audio source should be the Engligh DTS-HD MA soundtrack. On the drop down next to it select DTS-HD Passthrough.
6. Click start. This will take a few hours.
7. To view the new MKV open it in VLC. You can check you file's attibutes by downloading a programs called mediainfo.
If the goal is making a Blu-ray using a 50GB disc you are fine. If you are using a 25GB disc you have to change the bitrate of the video in Handbrake to about 15000kps so the final size of the MKV is about 21 GB. This will important in Part 3.
For The Dark Knight you run into a little problem. Handbrake supports DTS-HD MA passthrough but not Dolby True passthrough. So if you want Dolby True, you will need: MKVToolnix (http://www.bunkus.org/videotools/mkvtoolnix/) and MKVextractgui2 (http://sourceforge.net/projects/mkvextractgui-2/).
8. Install MKVToolnix and take mkvextractgui2 and put it into the MKVtoolnix folder. Put the original IMAX MKV (from MakeMKV) of TDK into mkkextratgui and extract the Dolby True soundtrack.
9. Run mkvmerge GUI (mmg.exe). Pop the Handbrake 2.39 MKV into mkmerge keep the H.264 video checked but unselect the audio track. If it gives you an error about not knowing the frame rate, highlight the video file, click on the Format specific options and make sure the FPS is set to 24000/1001. Pop in the Dolby True soundtrack extracted from the IMAX MKV into mkvmerge (you can also do the Dolby Digital if you want). So you should have the AVC video checked, then unchecked audio track you created in Handbrake and the checked Dolby True. Set the Output filename and click on Start muxing. You should have a MKV with the new video and Dolby True soundtrack. Here is an example off the finished (I put the AC3/Dolby Digital in there as backup for the True soundtrack):
Continued in Part 3
Framing That In A Differnt Light: Re-framing The Dark Knight Rises Blu-ray Part 1
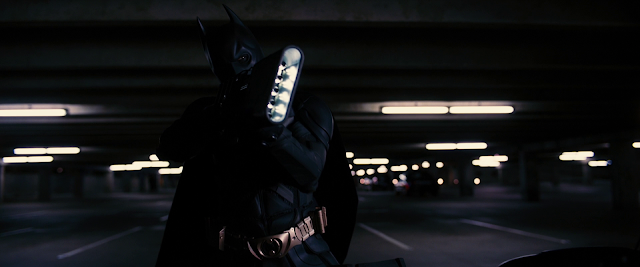
Modern movies generally come in two favors of aspect ratios 1.85 and 2.39 (or 2.35 for movies before 1977) but in the past there have been dozens of different aspect ratios, 1.33 (pre-1954 movies), 1.66 (European Widescreen), 2:20 (65mm/70mm film), etc, etc. You can read more about it here: http://en.wikipedia.org/wiki/Aspect_ratio_(image) and here: http://en.wikipedia.org/wiki/List_of_film_formats. Modern High Definition TVs have an aspect ration of 16:9 or 1.77 to which 1.85 fits nicely into. 2.39 on the other hand has to be "letterboxed" (http://en.wikipedia.org/wiki/Letterbox), which mean black bars are placed at the top and bottom of the screen to maintain the aspect ratio. In the last few years a few directors have shot their movies in multiple aspect ratios mostly for the rise of IMAX in movie multiplexes (aka: LIEMAX). Shoot the movie in one aspect ratio but open it up for special scenes in IMAX. Tron Legacy did this, Transformer 2 did this but the most famous movies for doing this are The Dark Knight and The Dark Knight Rises. That is why if you watch either of these films on Blu-ray, the aspect ratio is constantly changing. The 1.85 scenes were the reformatted IMAX scenes and the 2.39 scenes from regular 35mm film. You can see this in the example above from The Dark Knight Rises. This all plays very well on a modern HDTV but what happens if you don't have a 16:9 TV, what if you have 2.39 TV?
Some people, like me, have digital projectors in their homes. This is an attempt to create a movie like atmosphere at home. Most screens are 16:9 but a few stupid people (read: me) have 2.39 screens. It can be a pain but I really do think it creates a more expansive cinema experience at home. You can achieve a 2.39 (or 2.35) through two methods. The cheap way is done through zooming the lens (I do this) or with an expensive anamorphic lens. These seem to be good articles on the subject: http://www.projectorcentral.com/235_home_theater.htm and http://www.hometheater.com/content/235-movies-235-screen.
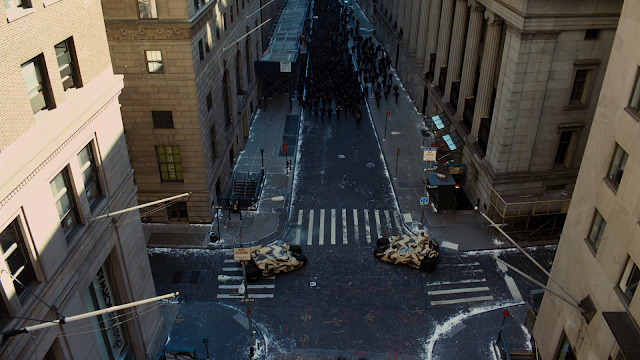
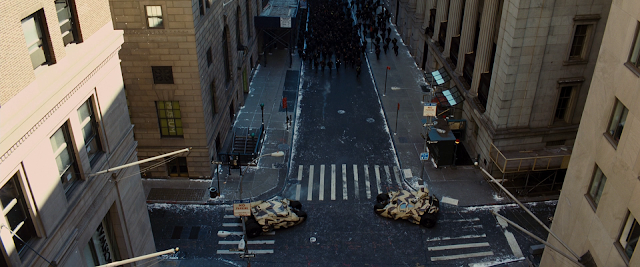
The problem with movies like The Dark Knight Rises is you can't keep changing your project to accommodate the constantly changing aspect ratio. So, what do we do? Well The Dark Knight Rises was also meant to projected in non-IMAX screens in constant 2.39. They simply made sure that all the important information was in the center of the screen and matted out the rest. So the above picture becomes this:
This guide is an attempt to show how you can re-format The Dark Knight Rises Blu-ray (or The Dark Knight) with free tools from the Internet and not more expensive programs like AVID, Premiere or Final Cut. Basically you will change this:
into this:
Or this:
into this:
while not changing the director's original intent as seen in both non-IMAX movie theaters and the DVD (both where in 2.39). Part 2 of this guide will show you how create the new re-framed Dark Knight Rises and store it as a MKV file. Part 3 will show how to take that MKV and changing it into a Blu-ray.
Subscribe to:
Posts (Atom)


.png)
.png)


